This document decribes the operation and usage of the GPS Tracker MK I. The tracker consists of a Garmin eTrex handheld GPS unit, and the custom "Tracker Box" which contains a small computer, a specialised cell phone, a battery, and some software to ask the GPS unit for the current position and to send the position via the cell phone network to a web server.
Please keep in mind that the GPS Tracker is a "one-off" prototype, and still somewhat experimental. So although it has survived several hundred miles trail riding to date, it is not as robust or waterproof as most electronics designed for mountain biking. Until some further sealing work is done on it, please try and avoid exposing to particularly damp conditions. In particular, a rear guard is recommended in wet conditions so it is not exposed to spray off the rear wheel (see picture below, in the saddlebag mounting section).
Also note that the GPS receiver doesn't need to be connected to the tracker unit - it will operate standalone using its internal batteries, and record tracking information internally (so you can, e.g. use just the GPS on the bars without fitting the saddlebag). However, the tracker unit also supplies power to the GPS receiver, which otherwises lasts a maximum of 20 hours on a set of batteries (see the Runtime and Charging section for additional information).
To start the GPS tracker, begin by turning the GPS receiver on by pressing the semi-recessed button on the right side of the case for a couple of seconds (the display should become active and indicate it is searching for GPS signals).
Next, make sure the cable from the Tracker box is firmly attached to the GPS receiver (it's ok to connect it with the power on) then switch the Tracker box on by operating its own (recessed) power switch. It can be a bit fiddly, try using e.g. the blunt end of a pencil. There is a positive 'click' when it operates, and the LED inside the tracker box will come on for a few seconds. The LED then blinks on and off a few times while the tracker registers with the cellphone network. Once it has registered, the LED will be mostly off, with a brief blink every 3 seconds or so to indicate all is well.
The tracker is now operational and will report its position to the website every couple of minutes. As long as the GPS receiver has a clear way of the sky (it may work indoors under a thin roof or close to a window), it will lock on to the satellites within 60 seconds, and then everything is ready to go!
To verify operation, go to the position tracking page, which is updated each time the tracker reports its current position. The web page also reports the time of the last update, along with the OS Grid Reference and the Latitude/Longitude.
GPS works by measuring the distance to a bunch of satellites, and uses these distances to work out the location (Latitiude and Longitude) of the GPS receiver. Note that it doesn't have any sense of "direction" as such - it has to work out which way the receiver is travelling by comparing the current position with the previous one (though some GPS receivers also include an electronic compass to get around this).
In a typical GPS receiver, then, everything is stored in terms of positions (and times too, for track logs). When using a GPS receiver or reading its manual, it's important to remember these three definitions:-
- Waypoint - A position you're interested in, and have stored in the GPS unit
- Route - A route you'd like to follow, made up of a series of Waypoints
- Track - A recording of where you've been (like a "breadcrumb" trail)
The GPS unit has 5 buttons on it - 3 on the left side (roughly, "up", "down" and "enter") and 2 on the right ("page selection" and "power on/off" - note the power button is semi-recessed). Use caution when operating the buttons while riding! Particularly when operating the unit on the left side of the bars, it's very easy to accidentally turn the power off with your thumb when operating the "up" and "down" buttons.
The "page selection" button (top right) cycles through the various displays - just keep pressing it until you get to the one you want. It also serves as a "cancel" button, to back out of any of the sub-menus.
The "enter" button (lowest button on left) works differently depending on the current display, but generally acts to pop up additional menus, to select choices, and to acknowledge prompts etc.
The "up" and "down" buttons (top 2 on the left side) are used to scroll up and down through sub-menus, adjust screen contrast, zoom in and out, etc., depending on the current display.
To set up before a ride/event:-
- On 'menu' page, clear old track data (n.b. do this *after* GPS lock obtained)
- On 'trip' page reset the trip data (not essential)
- On 'altitude' page, reset the elevation data (not essential)
CAUTION: If the unit has been preloaded with route data (e.g. South Downs Way route) then *do not* clear either the "Waypoint" or the "Route" data - make sure only the "track data" is cleared.
For further information, you can get the Quick Start Guide [pdf] and the full Owners Manual [pdf] from the Garmin website.
Identify the handlebar clamp, and undo the cross-head screw completely so the clamp can be hinged open. Attach it to the bars with the bolt to the rear, using a strip of rubber underneath to provide for anti-vibration and anti-slip. Do the screwly up loosely at first, so the GPS display can be set to a suitable angle after which the screw can be tightened down.
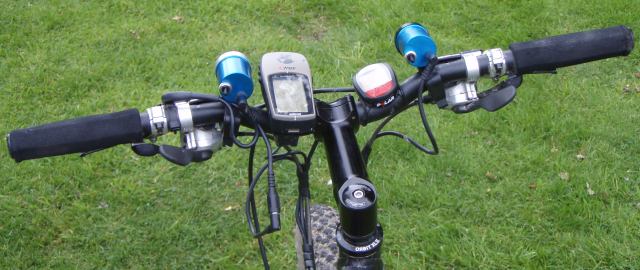
GPS unit mounted on handlebars
The usual mounting position is near the stem clamp, but not too close (else the body of the GPS receiver may foul on the stem clamp) and bearing in mind that the buttons are on the side of the unit (so if you plan to twiddle with the unit while riding, make sure there is space enough between e.g. lights and cycle computers etc.
Attaching and removing the unit can seem fiddly at first, but is easy with practice - force is not required! Basically, to install hold the GPS unit above the mount (slightly to front of it) then move back and forth until it drops down into the mount. Then slide the unit backwards - there will be a positive "click" as the latch engages. The unit should not slide back/forwards at all now.
To remove the unit, look under the mount of the mount to identify the small latch lever - press this upwards, and slide the GPS unit forwards then up.
To remove the Tracker box from the saddlebag, first take the saddlebag off the bike and remove anything stored in the top compartment. Undo the lowest zip (which allows the base of the bag to expand) and finally undo the middle zip, which reveals the tracker unit. You can now flex the base of the bag down a little to clear the tracker aerial and ease the tracker unit out - the aerial can be flexed slightly to make this easier if necessary, but do not use force as the aerial is quite delicate (n.b. do not attempt to unscrew the aerial!).
To re-install the tracker unit, make sure all compartments in the bag are empty and the lower zip is fully undone. Flex the base of the bag down while easing the tracking unit in, with the aerial facing down and towards the rear of the bag. Once the tracker is mostly inside the bag, align the hole in the base of the bag with the aerial so the aerial pokes out of the base (if it doesn't appear to line up, check you have the tracker in the correct orientation!).
Once the tracker is in the bag, do up the lower zip and put something in the upper compartment to act as padding (e.g. spare inner tube, or rags/tissues etc). The wire to the GPS unit comes out via the middle zip, so when this zip is done up the wire comes out at the end of the zip.
Mount the saddlebag using the two velcro straps, which go over the saddle rails then through the loops at the bottom of bag and are folded back on themselves for velcro closure. Usually it's easiest to do these up loosely at first. Next fit the strap around the seatpost, and finally go around tightening all 3 straps up.
![]()
Saddlebag mounting and wiring
Run the wire along the top tube as convenient (electrician's tape can be used to stop it flapping), then alongside the brake or gear cables up to the GPS unit, attaching it using spiral wrap. Attach the plug on the end of the wire to the GPS unit by sliding it in from the top, and make sure this wire won't be pulled/shaken loose etc. Ideally, use the spiral wrap to support the cable and attached interference suppressor (the blob in the cable near the GPS end) as close to the unit as possible.
The GPS receiver and Tracker box have separate power switches, but it doesn't really matter what order they are used in. Also it's ok to attach and disconnect the plug at the GPS end with the power on.
To turn the GPS on and off, hold down the power button (semi-recessed button on the right side) for a couple of seconds (note: when the GPS is on, a brief tap on this button turns the backlight on and off).
The power switch on the tracker box is a bit fiddly and the unit will need slightly easing out of the saddlebag to access it. Press it straight in with blunt object (e.g. round end of pencil) to turn the unit on/off. It should make a positive "click" when it operates. You can check if it's on by watching for the LED near the power switch - this comes on solidly for a few seconds before starting to blink when the tracker is switched on, and is always off when the unit is off.
The LED in the tracker box also shows the cellphone status; after power up it will start to blink with equal on/off time until it has registered with the cellphone network. Once registered, it will blink briefly on once every 3 seconds. After switching off, double-check that the LED is definitely off (and not slow-blinking - watch it for at least 5 seconds to confirm this).
A useful confidence check is to go to the GPS 'Menu' page and look at the bottom of the screen. When the tracker unit is on and plugged on, the battery icon is replaced by a 2-pin power lead icon (this shows the tracker box is on and providing exteral power to the GPS receiver).
The Tracker unit contains a high-capacity Li-Ion battery capable of running the internal computer, cellphone module and providing external power to the GPS receiver for at least 24 hours (even with the GPS backlight left on all night). At present the unit does not have a charge indicator, but should not be charged too frequently - during testing and checkout, charge the tracker once around once every 12 to 15 hours of runtime, and obviously charge it fully before a long event.
To charge the tracker, remove it from the saddlebag and plug the charger lead into it. Attach the mains lead to the charger and turn it on at the mains (note: the tracker must be OFF, else it will not charge). The charger LED should turn RED to indicate charging is in progress. Once charging has completed (6 to 12 hours) the LED will turn to GREEN to indicate the battery is fully charged. Note that the charger should always be left on until the LED turns green (to avoid partially charging the battery).
NOTE: if the charger LED remains green when starting a charge cycle, first check the charging cable is connected ok and that the tracker is OFF. If so and the LED is still green, this usually indicates that the battery is already fully charged.
If the GPS receiver is used standalone (i.e. not attached to the tracker) it will use its internal battery (2xAA) which last for a maximum of 20 hours (compass off, no backlight). A track log is still recorded internally by the GPS unit when on internal power. Note that when attached to the tracker and with the tracker on, the GPS 'Menu' page will show an 'external power' icon in place of the battery icon. If the tracker battery goes flat (or the tracker is switched off) then the GPS unit will switch over to its internal batteries (so the total GPS runtime available is the runtime of the tracker unit battery PLUS the time afforded by the internal batteries).
Before starting an important event, the GPS receiver should have fresh internal batteries (to check the battery level, disconnect or switch off the tracker and look at the battery icon on the GPS 'Menu' display).